
Read time: 5 MIn
Imagine when you open your Excel file (.xlsx, .xls), and suddenly an error pops up: “Excel cannot open the file because the file format or file extension is not valid.” In one instance, you lose your important data. A severely damaged XLSX file can stop your work instantly and create unwanted stress.
In this guide, we will discuss the simple and effective methods to repair XLSX file. Whether your Excel XLS file corruption is minor or serious, we will help you get your data back quickly and safely.
Proven Ways to Fix and Repair XLSX File That Won’t Open
When an XLSX file fails to open, the issue is often due to corruption, an incorrect file extension, system failure, or a large file size.
File damage or corruption can affect Excel structure, formulas, formatting, or make the file inaccessible. If you face problems like error messages, freezing, unreadable content, incorrect extension, or blank sheets.
Below are effective solutions to repair XLS file data quickly and easily. Start with the basic methods below and, if needed, proceed to advanced repair options.
Method 1: Repair Excel XLSX File Severely Damaged with Open and Repair
Through its built-in “Open and Repair utility,” Microsoft Excel allows users to directly repair corrupted Excel files.
Microsoft Excel won’t open? It is also a big issue. Now, to solve the not opened Excel error, you can follow below steps to repair Excel files with Open and Repair:
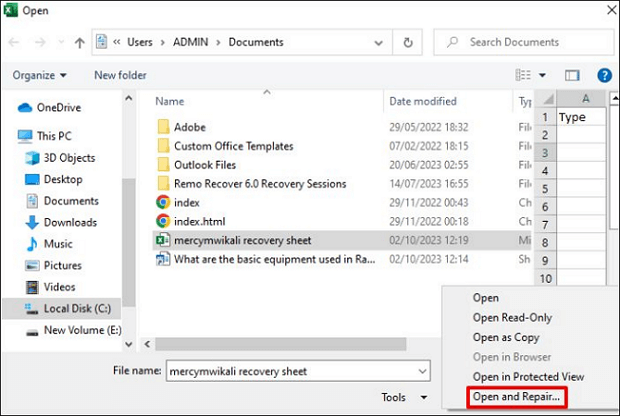
- Open a new Excel file and access the “File” option in step one.
- Go with “Open” option.
- Find corrupted XLSX Excel file.
- From the drop-down select the corrupted XLSX Excel file, then click “Open.” Opt for “Open and Repair.”
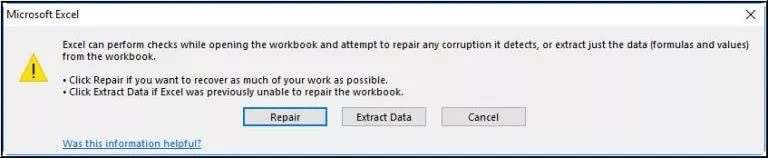
- In the next section go with “Repair”.
- “Extract Data” command takes over after “Repair” fails to solve corrupt Excel files.
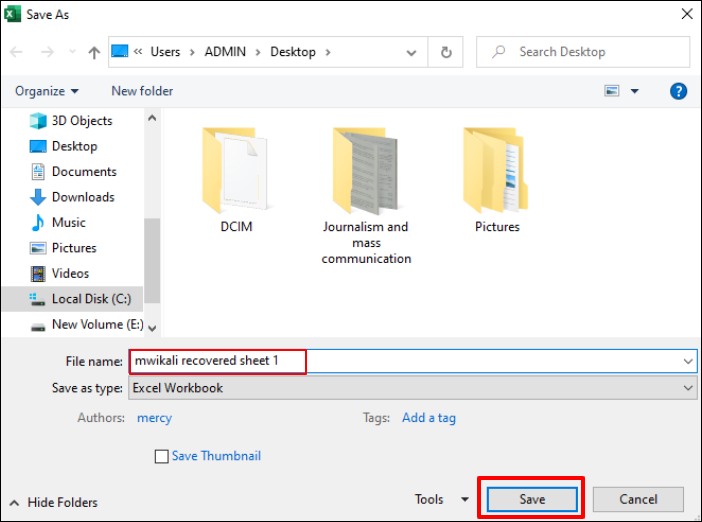
- Save your file. Follow these steps to save the repaired file: After it opens, first save using the keyboard shortcut “Ctrl+S,” and then open “This PC” and pick any storage location; for our needs, we select “Documents.”
- Enter your preferred file name into the save dialog box, then select the Save option.


The file name entered at this step should be different from what you used on the corrupted Excel document to prevent data loss. Science Word enables file repair in addition to Microsft Office’s built-in Excel file recovery functionality. BLR Excel Repair tool installation on your computer will enable you to safely fix Excel files when the first method fails.
Method 2: Repair MS Excel by Using Native Repair Feature
Microsoft created built-in repair capabilities to assist users with addressing diverse little issues affecting their Office documents. Users can apply the built-in Open and Repair feature of Excel to restore XLS or XLSX files that show only light damage.
Start Excel application, then open the file through Menu > File > Open to fix corrupted Excel files. You will find the corrupted Excel document through system file selection followed by document choice.
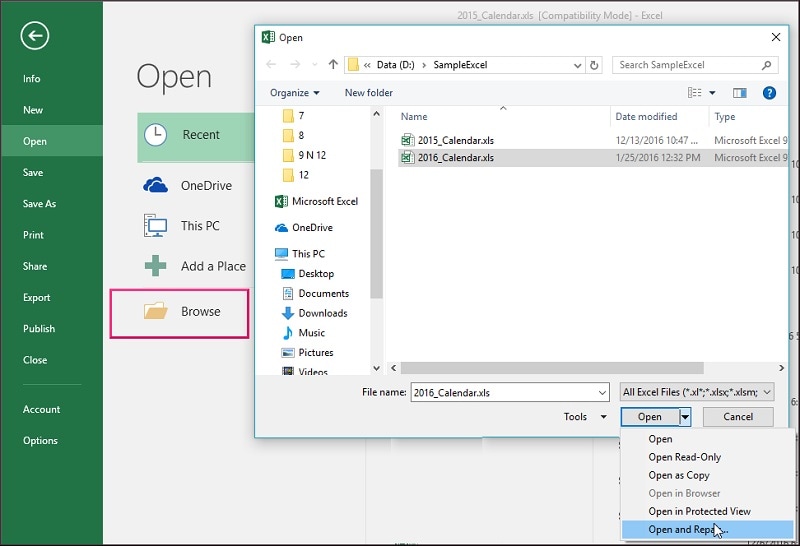
Exceeding traditional Excel loading procedures, you find a dropdown button by the Open function. Both “Open and Repair” and “Extract Data” options appear when you select the “Open” dropdown. Choose “Open and Repair” to salvage damaged XLS files instantly, while “Extract Data” lets you retrieve values from Excel XLSX file severely damaged when repair attempts fail.
Method 3: Change Calculation Settings and Excel XLSX File Severely Damaged
Open a corrupted Excel workbook when it refuses access by disabling automatic calculations before attempting access. Here’s how you can alter the calculation settings in Excel to potentially access your file:
- Launch Excel with a new workbook active by selecting the “Options” setting under the “File” command across from the upper-left corner.
- The “Options” dialog presents the “Formulas” tab that can be accessed by clicking the tab. To prevent automatic processing, select “Manual” from “Workbook Calculation.”
- After saving the dialog changes with “Ok” navigate to “File” > “Open” where you need to select and attempt opening the damaged XLS workbook.
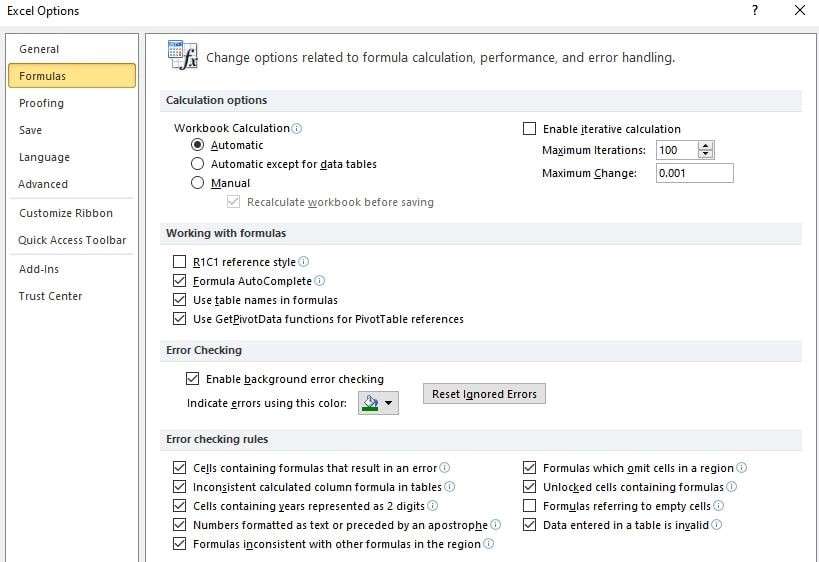
Note: For future calculations, select “Automatic” from “Calculation Options” since you switched to “Manual.”. Doing so maintains Excel’s automatic function calculation process in your other file documents.
Method 4: Convert Excel Files by Altering Their File Extensions
Learning about file type importance represents your first step in this process. Older systems or earlier versions of Excel produce files that sometimes cause stability problems when opened in newer Excel versions. Excel supports document file storage through multiple file type formats.
By changing the Excel file format documents to “xlsx” (or “xls”), it fixes compatibility problems.
Here’s a tutorial for changing the file extension of an Excel file:
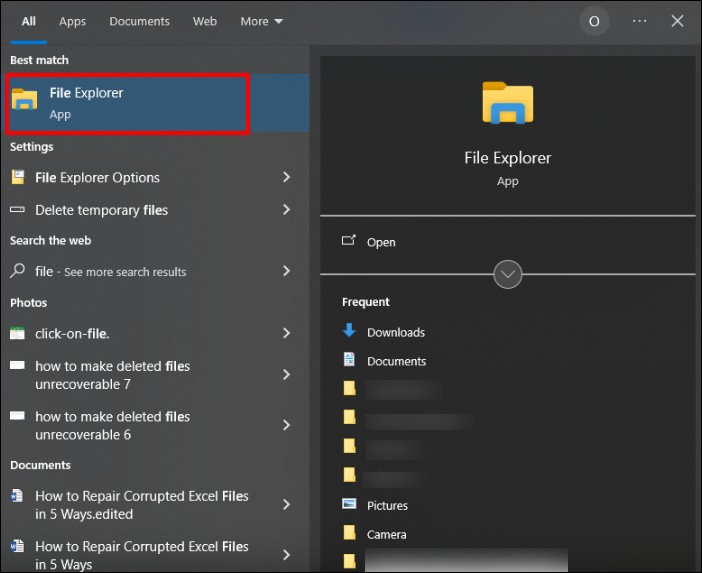
- Access the “Start menu.” Users must click the “Windows icon” positioned in the screen’s lower-left corner.
- Open “File Explorer.” Access the folder-shaped icon that appears in the lower-left corner of the Start window.
- Navigate to the “View tab”. The “View” tab above “File Explorer” activates a toolbar that will become visible beneath it.
- Enable “File name extensions”. You can access this function when you expand the “Show/hide” section of the toolbar.
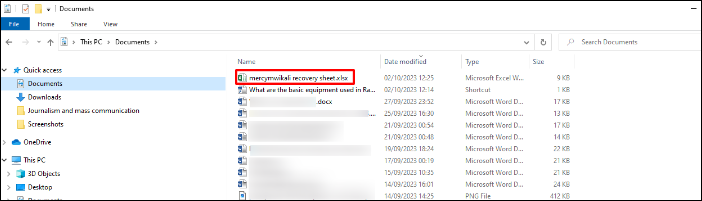
- Choose your Excel file. Click to select your preferred Excel document located within its folder directory.
- Access the “Home tab”. The upper-left corner of the “File Explorer” window holds the “Home tab.” Clicking this tab reveals the toolbar.
- Opt for “Rename”. Users can find the “Rename” feature inside the “Organize” section of the toolbar.
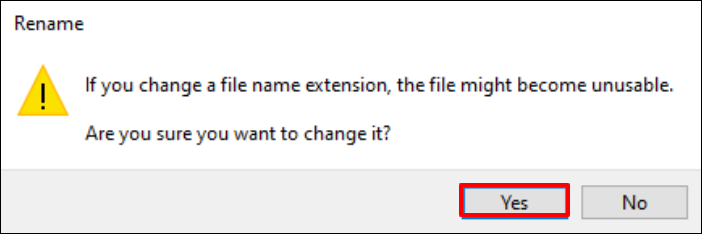
- Modify the file type. Type the file extension “xlsx” after the period at the end of the filename then press “Enter.” The “xlsx” file extension exists, so try renaming files with “xls” or “HTML” instead.
- Select “Yes” to confirm the change after it prompts you to.
- Test file accessibility. To start viewing the file simply double-click it. Viewing your file in Excel through a web browser set to display “html” as the file extension indicates that your file recovery process has been successful.


Method 5: Try to Repair via Microsoft Office
Commence repair of your XLSX file through the Microsoft Office Tool after Excel fails to access the corrupted workbook.
Use these steps to execute the repair:
- Member can reach “All Programs” through the “Start menu”.
- Start with “Microsoft Office”> then choose “Microsoft Office Tools”.
- Check “Microsoft Office Application Recovery”.
- Open the option “Microsoft Office Excel” from the dialog box if it appears.
- Select “Recover Application”. This task needs approximately several minutes to finish.
- Click on the “Send Report to Microsoft” prompt.
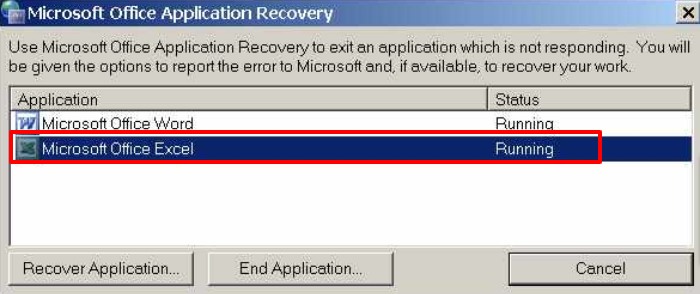
Once activated the tool executes a process to close Excel open files then it restarts Excel while showing you the list of restored Excel workbooks.
Method 6: Repair Excel XLSX Files via Excel Repair Software
If none of these solutions repair the corrupted Excel file, using a professional excel file repair solution becomes necessary. BLR Excel Repair tool is a secure and efficient solution that will repair XLSX files in bulk at once without any hassle. This useful tool works specifically to help users successfully restore their corrupted Excel files.

All you need to do is add the Excel XLS/XLSX files. The tool will scan them and show severely that the file is corrupted and how much data can be recovered. After that, you can choose the file you want to repair, and this tool will do the task for you. To know the detailed XLSX repair process, you can use the demo version of the software.
Final words
A corrupted Excel xlsx file doesn’t always mean you lost your data. Manual solutions can help fix small issues, but they may fail when the file is severely corrupted.
Choosing the right method to repair XLSX file is essential to safely retrieve your Excel data in proper formatting. With the proper solution, you can quickly regain access to your XLSX file and continue your work without interruption. So choose wisely and fix your Excel file.